In this video by The Slanted Lens, the basics of a one light set up is shown; including how to create a highlight to shadow ratio with a contrasting background shadow. It also gives some make up ideas for the model and shows how using a see through/netting material can be used to give a softer look to the image as a whole. They have mainly taken their images through stills of video footage of the model moving her hair. I have learnt some useful points from watching this video. First of all, J P Morgan describes the similarities of a face and a ball and uses a ball as an example to show how the light will hit the object and the shadow that it will cause. As a ball and a face are both round surfaces, this helps show a more simple version of how the light will change the shadows on the face of the model and also the background. I have learnt that the highlight to shadow ratio is important and that it is important not to have too much of one - by having the right amount of both, it gives a more natural light to the photograph. I have also learnt about how to create a contrasting background shadow - by having the shadow of the soft box ending on the background where the shadow of the face starts, the light creates a shadow on the background the side that the face is highlighted, and a shadow on the face the side the background is highlighted. Additionally, I have learnt that by filming the model move their head or hair, effective stills can be taken. I would like to use these techniques in my own work to get effective shadows and highlights, and also the use of material and make up that was experimented with towards the end of the video. I like the make up that was used in this video - the first part made the model look more natural, whereas the second part made her look more bold and made a statement. The use of sequin material was interesting - I would like to experiment with this in my own work as I like how it can give a softer look to the image, and I also like the photographs that were taken where you could see the model through the material.
Fashion, glamour, modelling, posing and lighting are all covered in this video to get beauty fashion portrait shots. This tutorial includes good techniques for the background, model, lighting/mood lighting, camera settings, materials, poses, make up, fashion and for final editing to the photograph using Photoshop and Lightroom. This tutorial was full of useful techniques that I would like to use in my own portrait photography. Firstly, I learnt that a good way to separate the model from the background is to use strobe lights behind the model that will be in the photograph - this is good for rim lighting and ambience. In this tutorial, it is shown how a dark background is effective for this low key shoot - in this particular photo shoot, the main light was put around 15 ft away from the background to make sure that the light was on the model without spilling onto the background. This tutorial gave some good tips for camera settings for portrait photography when using this kind of lighting. I have learnt that by using lower f/stop numbers, it decreases the background sharpness. In the video, it was recommended to use a low ISO, moderate aperture and a relatively fast shutter speed. For this photo shoot, they used and ISO of 100, f16 for the aperture and 1/250 shutter speed. This video was also useful for make up techniques and fashion ideas. It was suggested to use simple and natural make up so that it is not distracting, but to use more colour than usual to create more depth and colour as the lighting tends to wash out the face. They advised to add make up that puts emphasis on the eye crease, eye lashes, eye brows and cheek bones so that the features of the face are brought out. They also suggested neutral, reflective clothing - in their photo shoot, a beige dress with sequins was worn. Photoshop and Lightroom techniques were also given in this tutorial. To take away any unwanted background features, I learnt that by selecting the area with the Lasso Tool and pressing shift+F5, the area can be given a content aware fill. This can also be used on the models skin to take away any large blemishes or birth marks, and smaller blemished can be taken away by using the Spot Healing Tool. To add final touches to the face, I have learnt that the Dodge Tool can be used (on Mid-tones settings with a 50% exposure) around the eyes to brighten them, and the Burn Tool can be used with the same settings to smooth the make up and add shadows around the eyes where they are wanted. In this tutorial, they also used Lightroom to create a warmer/cooler glow and by using the Luminance Tool, made the skin more smooth and radiant looking. A blue shadow was also added to give a glamorous look to the model without looking washed out; the shadows and contrast were made higher to make the model more defined. I would like to use many of the techniques that I have learnt for this tutorial in my own work. I like the use of strobe lights that are used to break up the background - they create a more interesting image, and make the lighting more effective. I also like how the pegboard was used in the background with the strobe lights - the lights shone through the holes making the background more interesting. I also like the modelling for this photo shoot - I like the use of eye contact with the camera and the hair movement. I learnt a lot about lighting effects and techniques through this tutorial as well as Photoshop and make up techniques.

 In this video by The Slanted Lens, the basics of a one light set up is shown; including how to create a highlight to shadow ratio with a contrasting background shadow. It also gives some make up ideas for the model and shows how using a see through/netting material can be used to give a softer look to the image as a whole. They have mainly taken their images through stills of video footage of the model moving her hair.
 I have learnt some useful points from watching this video. First of all, J P Morgan describes the similarities of a face and a ball and uses a ball as an example to show how the light will hit the object and the shadow that it will cause. As a ball and a face are both round surfaces, this helps show a more simple version of how the light will change the shadows on the face of the model and also the background. I have learnt that the highlight to shadow ratio is important and that it is important not to have too much of one - by having the right amount of both, it gives a more natural light to the photograph. I have also learnt about how to create a contrasting background shadow - by having the shadow of the soft box ending on the background where the shadow of the face starts, the light creates a shadow on the background the side that the face is highlighted, and a shadow on the face the side the background is highlighted. Additionally, I have learnt that by filming the model move their head or hair, effective stills can be taken.
 I would like to use these techniques in my own work to get effective shadows and highlights, and also the use of material and make up that was experimented with towards the end of the video. I like the make up that was used in this video - the first part made the model look more natural, whereas the second part made her look more bold and made a statement. The use of sequin material was interesting - I would like to experiment with this in my own work as I like how it can give a softer look to the image, and I also like the photographs that were taken where you could see the model through the material.
 Fashion, glamour, modelling, posing and lighting are all covered in this video to get beauty fashion portrait shots. This tutorial includes good techniques for the background, model, lighting/mood lighting, camera settings, materials, poses, make up, fashion and for final editing to the photograph using Photoshop and Lightroom.
 This tutorial was full of useful techniques that I would like to use in my own portrait photography. Firstly, I learnt that a good way to separate the model from the background is to use strobe lights behind the model that will be in the photograph - this is good for rim lighting and ambience. In this tutorial, it is shown how a dark background is effective for this low key shoot - in this particular photo shoot, the main light was put around 15 ft away from the background to make sure that the light was on the model without spilling onto the background.
 This tutorial gave some good tips for camera settings for portrait photography when using this kind of lighting. I have learnt that by using lower f/stop numbers, it decreases the background sharpness. In the video, it was recommended to use a low ISO, moderate aperture and a relatively fast shutter speed. For this photo shoot, they used and ISO of 100, f16 for the aperture and 1/250 shutter speed.
 This video was also useful for make up techniques and fashion ideas. It was suggested to use simple and natural make up so that it is not distracting, but to use more colour than usual to create more depth and colour as the lighting tends to wash out the face. They advised to add make up that puts emphasis on the eye crease, eye lashes, eye brows and cheek bones so that the features of the face are brought out. They also suggested neutral, reflective clothing - in their photo shoot, a beige dress with sequins was worn.
 Photoshop and Lightroom techniques were also given in this tutorial. To take away any unwanted background features, I learnt that by selecting the area with the Lasso Tool and pressing shift+F5, the area can be given a content aware fill. This can also be used on the models skin to take away any large blemishes or birth marks, and smaller blemished can be taken away by using the Spot Healing Tool. To add final touches to the face, I have learnt
  that the Dodge Tool can be used (on Mid-tones settings with a 50% exposure) around the eyes to brighten them, and the Burn Tool can be used with the same settings to smooth the make up and add shadows around the eyes where they are wanted. In this tutorial, they also used Lightroom to create a warmer/cooler glow and by using the Luminance Tool, made the skin more smooth and radiant looking. A blue shadow was also added to give a glamorous look to the model without looking washed out; the shadows and contrast were made higher to make the model more defined.
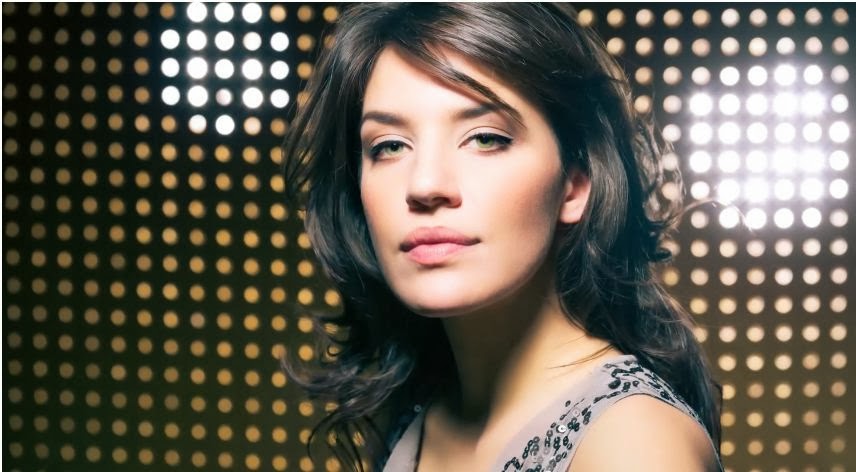 I would like to use many of the techniques that I have learnt for this tutorial in my own work. I like the use of strobe lights that are used to break up the background - they create a more interesting image, and make the lighting more effective. I also like how the pegboard was used in the background with the strobe lights - the lights shone through the holes making the background more interesting. I also like the modelling for this photo shoot - I like the use of eye contact with the camera and the hair movement. I learnt a lot about lighting effects and techniques through this tutorial as well as Photoshop and make up techniques.
No comments:
Post a Comment